
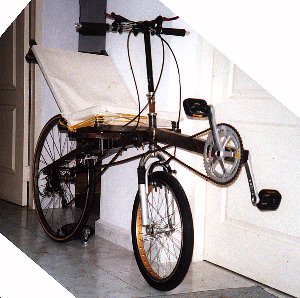
Recumbents - Fully Suspended Steel ASS SWB
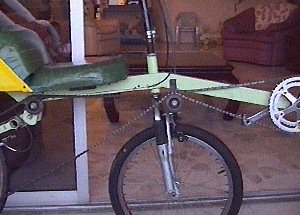
The Mercedes Bent in all its glory
Much as I enjoyed riding the faired aluminum SWB, I got pretty nervous every time I went over a bump. Every time I read a discussion about the properties of aluminum vs that of steel, I got even more nervous (you know, metal fatigue, catastrophic failure etc). I also kept inspecting the glued joints looking for cracks before and after a ride. My rides were limited to smooth roads which invariably meant jostling with cars instead of enjoying the meandering bicycle pathways which in Singapore are littered with speed bumps to discourage reckless cycling (the paths are shared with pedestrians, you see, which include kids and little old ladies).
I had just picked up brazing (initially because I wanted to braze together a steel seat frame) and found it really quite easy and fun, after a few false starts. I use a hand-held MAPP-air torch, which is safe, cheap and convenient. A good place to start learning how to braze would be The Brazing Book Online. I also derived quite a bit of inspiration from Josh Putnam. My own tips? Use bronze rather than silver. It's cheaper, the tensile strength is greater and the tolerances are less demanding (ie the pieces don't need to fit together so well, which is important for someone like me). Make a paste out of Borax powder and smear generously all the surfaces to be joined. Heat all the parts until they're bright glowing red (not cherry or dull red). Continue applying the flame even as you apply the brazing rod. OK. 'nuff said. I don't want to get flamed by genuine braziers (is that what they're called?). No pun intended. Really.
Anyway, I had started work on a steel frame which I abandoned halfway and left to rust. Here's a pic of the (once) abandoned bike which was never ridden:
Square Sabre / Heavy Metal clone
This bike was actually meant to be a square tube-version of the Vision Sabre, but I decided later it looked more like a Heavy Metal clone. Well, I would decide what to call it or compare it to when I finished it. As you can see, the head tube below the frame was made too short to achieve the design specs of Heavy Metal.
Anyway, to cut a long story short, since I could now braze, I made a fully suspended steel frame which I am very happy with. The manufacture of the rear swingarm was inspired by the (warning: big picture) Greenspeed Trike's rear subframe, since I could not seem the get the angle right for making chainstays which stuck out from the frame at an angle. Without further ado, here are some details:
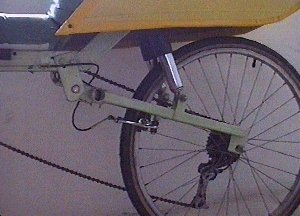
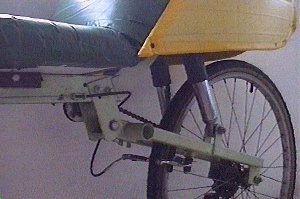
Two views of the rear suspension swingarm
The rear shocks are from a motorcycle spare parts shop (S$18 per pair) and are bolted onto tabs brazed onto the swingarm. The chainstays (1" square mild steel) are parallel and are brazed onto a round tube (much like the Greenspeed Trike's rear subframe). The swingarm pivots on two tabs which were first bolted then brazed onto the main frame. The dropouts are fashioned from steel plate and brazed onto the chainstays. Angle grinders are wonderful things. The whole thing works much better than I expected, and much of the nervousness of riding is gone. The ride is incredibly plush, and road bumps don't exist for me anymore. I love cruising comfortably through a series of road bumps whilst watching other cyclists get their teeth r-r-r-rattled out of their s-s-s-sockets.
The rear fairing is pinched from the old aluminum SWB, shortened to fit. It's screwed onto the seat rather than taped on this time. This bike can now fit into the lift without having to stand it up on its rear wheel. This makes it a lot more convenient to go riding.
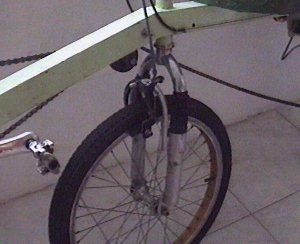
Front suspension fork
I got this 20" front suspension fork for S$90, which on hindsight was a bit expensive, because now they have 20" mountain-bike style clip-on suspension forks with cantilever bosses for S$85. At that time, though, this was the only one available. The original springs were far too weak (they bottomed out when I sat down on the bike) so I had a machinist make some stronger springs for about 10 bucks. The brakes are the normal side-pull type, which is a good thing I suppose because if I were to use V-brakes for the front the cables (which have to be on the right side) would interfere with the chain. The stopping power is quite a bit less than I would like. I am quite cautious about using the rear V-brakes for stopping because the weight distribution makes the rear wheel lock and skid very easily.
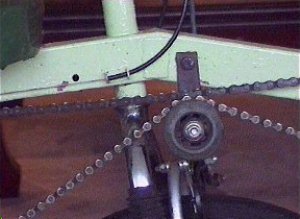
Chain routing / lumbar cushion
The chain is routed by two grooved rollerblade wheels as shown. Power loss is negligible, and the soft rubber of the rollerblade wheels makes the driveline very quiet indeed. The return idler is mounted on a steel plate bolted onto the frame. This makes it easy to adjust the position. Under tension, the power side of the chain straightens and clears the lower idler. Hope you know what I mean. The steering column is a mild steel tube clamped on with hose clamps, and the quill of the 7-bar (or whatever you call it) is inserted into the top of this tube.
The chainring is from a roadbike and is a Biopace (elliptical) one. Works great. I think it's a 53 tooth chainring.
Note the lumbar curve of the seat cushion. The seat is simple. Two pieces of plywood joined by a couple of hinges. The foam I got free from a mattress shop. This was cut to size, and strapped onto the wooden base with duct tape. Yes, folks, the whole seat is covered by nothing except duct tape.
Here's a closeup of some details:
Closeup
The bend in the tube is reinforced by a small tab of steel brazed into place. This is because brazed joints are strongest under shear stress rather than direct tension. The cable stops are fashioned by cutting a very short section of 1" square tube in half, and drilling a couple of holes (one big, one small). This is then brazed onto the frame. The paint job is very lousy, but it serves mainly to prevent rust. I used three coats - red oxide primer (the most important), white undercoat and a colour called "Calming Green" - so that I would not feel that I had to ride so fast all the time. The red oxide primer coat looked very nice on its own and I was tempted to leave it like that, but I had already bought all the other paints, so I went ahead.
How does it ride? Like I said, it's very plush. Top speed is not as great subjectively as the older SWB, and the fairing does not seem to work so well, probably because this seat is wider (18" as compared to the old one which was 12") and the fairing is quite a bit shorter. Less distance for the airflow to become laminar again I suppose.
This bike is probably heavier than some motorcycles, and is exquisitely sensitive to gradients. You can feel it the moment you're going even slightly uphill, but then again, going downhill is like someone just switched on a turbocharged motor. The way to do small hills is just to crank up speed before you reach the hill, and sheer momentum will carry you to the top, then you're home free gliding down the other side.
And now for the burning question: why is it called a Mercedes Bent?
1. Everyone in Singapore wants a Mercedes Benz
2. It's darn heavy, just like a Mercedes Benz
3. It's got a very plush ride, just like a Mercedes Benz
4. Factoring in R&D costs, it probably costs as much as a Mercedes Benz
5. It's a (Recum)Bent