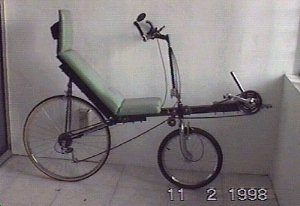
Recumbents - Unfaired ASS SWB
I enjoyed riding the bike after I had bolted the rear swingarm to the frame, making it a rigid bike. Unfortunately on one long ride, I went over a bump and heard a loud crack before finding myself suddenly lower and sliding along the floor, still on my seat. The rear swingarm had broken at its weak point, where I had glued the prongs to the main arm! I dragged the broken bike to the main road, hailed a taxi and brought the sorry mess home.
After moping for a couple of hours (minutes?), I decided that here was a chance to start anew. I still had the rear triangle from the racer I had chopped up for its bottom bracket, and figured that with some grinding I could fit it onto the frame. I could not weld it, of course, not only because I don't know how to weld nor did I have the equipment, but because (I think) you can't weld steel to aluminium. I also didn't want to glue it on (anymore), because I have since learned not to trust glue that much, despite claims of 5000-6000 psi strength. Someone had mentioned on the hpv list that bolts and rivets are perfectly legitimate building methods, and that they were in fact the standard in the aircraft industry, and I thought, why not.
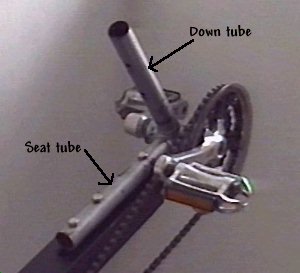
So I bolted the rear triangle on. The top part fit nicely into 1 1/2" square aluminium and the bottom part into 1" square aluminium. These pieces were in turn bolted onto the frame. Like so:
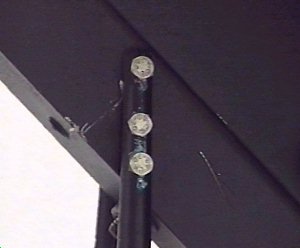
Top part of rear triangle bolted onto 1 1/2" square aluminium which is bolted onto frame
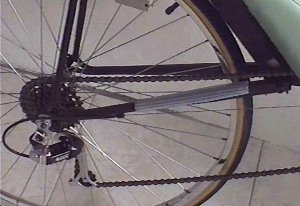
Bottom part of rear triangle bolted onto 1" square aluminium which is bolted onto frame
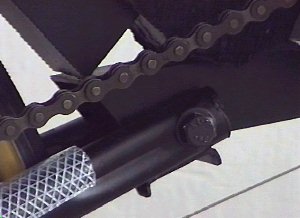
The "lizard skins" (to prevent the chain from scratching the frame when it slaps down) you see here is actually a short split length of water hose and self-clamped onto the tube. It's not so much to prevent scratches as to make the noise less irritating. Actually I later found out that the noise came from the chain rubbing the front chain guide. A quick wrench with the spanner to remove the chain guide and all was well.
The bottom bracket was derived from a second racer. I cut it off, leaving a short length of both the down tube and seat tube intact. The seat tube is then bolted onto the frame, whilst the down tube serves as a post for mounting the front derailleur. It looks really ugly, I know, but the beauty of this system is that if I should want the bottom bracket to be lower in relation to the seat height, I can bolt it to the bottom of the frame using the down tube. Of course, doing this means that I will not have a post for mounting a front derailleur, but actually at the moment I am using my fingers to shift the front gears anyway. Actually what's really happening is that I am using only the largest chainring most of the time anyway. I don't do hills, you see.
Bottom bracket's seat tube bolted onto frame
The ASS conversion was done as follows: the bottom half of a handlebar clamp from a BMX bicycle was inserted into the steerer tube. One side of a short length of 2" square section aluminium tubing was removed, leaving three sides as shown. A short length of steel tube (about the same diameter as the fork steerer tube) was fixed perpendicularly by drilling a hole of the same diameter in a block of wood and bolting it in place. The entire caboodle was then bolted onto the handlebar clamp. As usual, a picture is worth a thousand words:
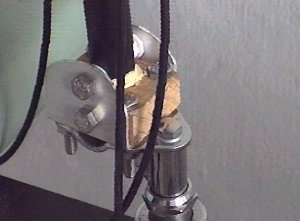
Caboodle bolted to handlebar clamp
The simple alternative, of course, would have been simply to weld the steel tube onto a small metal plate and drill four holes in the plate to accept the four bolts. However, it's become a matter of principle with me to try to build a bike without any form of welding being done. The other alternative would be to have one fixed bolt and one adjustable quick release skewer, just like a flip-it riser (I've heard of this, but haven't seen one yet, so someone correct me if I'm wrong).
The top of the steering column is made up of easily recognizable and obtainable components - mountain bike stem, handlebar and bar ends. The mirror is mounted on one bar end and provides an excellent view. I like hanging on to the bar ends whilst cruising - makes me feel like a pilot. The shifters allow you to choose between indexed and friction mode - a useful feature. Of course I use friction mode all the time.
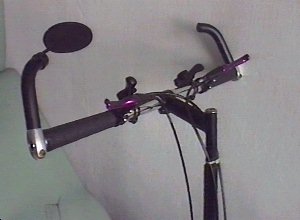
Handlebar assembly
The cable stop for the derailleur shifting cable was made from one of those you clamp onto a tube. I cut one into half and flattened it out, then riveted it into position. I bought a riveter and rivets just for this. A riveting experience, as they say.
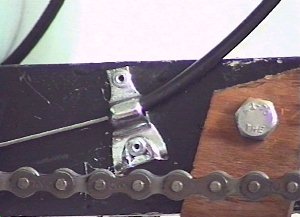
Cable stop riveted into position
The chain guides were made from old Rollerblade wheels. I used a thingamajig (in layman's terms, the central shaft of a hole cutter) to hold the wheel onto an electric drill, then spun it against a conical grinding drill bit. You can use a wood rasp or file or whatever. This cuts a nice groove in the circumference of the wheel, and the chain rests nicely in it. The wheels come with their own bearings, which fit very nicely into the 1/4" bolts I use for everything.
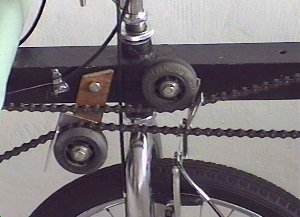
Chain guide set-up
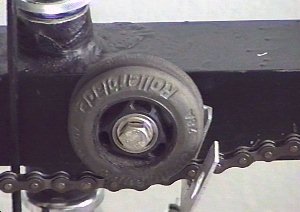
Recycled Rollerblade wheel
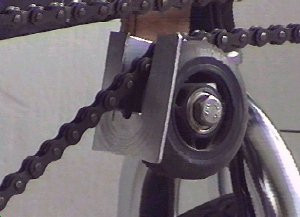
Chains are kept in place by guides made from (guess what?) 2" square section aluminium
The great thing about this latest incarnation is that the bike is actually short enough to barely fit into the lift, instead of having to stand it up on the rear wheel like I did with the suspended version.
Well, that's it for now. I've actually begun riding my recumbent in earnest and my legs are beginning to get bent. So far everything has held up and held together. Next will be a Vision Sabre clone, but first I must build a fairing for this bike. Here's a prototype:

I just need to cut a hole in the top for my head.