Recumbents - Low Racer
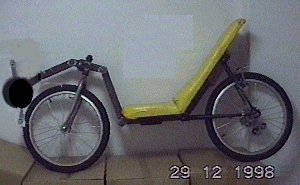
Lightly doctored picture of low racer prior to radical surgery
I can't seem to work on only one thing at a time. I had gotten a bit discouraged with the progress of the full suspension bike, so I decided to just start building a low racer from scratch. I had been eyeing the barracuda for some time, and promised myself I would build one of those some day. One day I decided why not now, so I went to the steel shop after work and bought a few pieces of 1.5" square mild steel tubes. I also bought a chop saw with adjustable angles, so cutting the required pieces took only about half an hour. I almost wet myself with excitement, just laying out the pieces on the floor, and within a day or two I had brazed the entire frame together. The rear triangle was from an old 10-speed, which I cut down to size to fit 20" wheels. This was bolted onto the frame. I also brazed on a couple of rear cantilever bosses to mount V-brakes. The seat was cannibalized from the aluminum SWB recumbent.
The wheels and front fork are from a brand new kid's mountain bike with 20" alloy wheels. Unfortunately there wasn't one with V-brakes, so I had to chuck the cantilever brakes and get a pair of V-brakes separately.
As you can see from the above picture, the low racer as it originally was had the chainring awfully close to the front wheel. It wasn't touching, but the cranks did hit the front wheel whenever I turned without moving the cranks out of the way.
That wasn't the worst part. Potential homebuilders, listen carefully: there is a right and wrong way to braze on a bottom bracket shell. You have got to make sure that the left hand thread of the bottom bracket goes on the right (chainring) side. Just trust me on this one. I consulted Sheldon Brown by email, who pointed me to this article (pedal threading). Allow me to quote: Ignorant people outside the bike industry sometimes make the astonishing discovery that the way it has been done for 100 years is "wrong." "Look at these fools, they go to the trouble of using a left thread on one pedal, then the bozos go and put the left thread on the wrong side! Shows that bicycle designers have no idea what they are doing..." Unquote. He's right. It's true. I went on a (very) short test ride and watched incredulously as the bottom bracket slowly unscrewed itself out of the bottom bracket shell as I pedalled. Can you say POLTERGEIST? The bottom bracket fell out and clattered onto the floor just as I reached home. OK, I'm exaggerating, but it almost happened.
I was a bit despondent for a couple of minutes. Then I was hit by a brilliant idea. I lugged the bike to my secret workshop and worked feverishly. A strategic cut was made in the front boom, the piece was flipped over and brazed on and - viola! - both problems were solved. The cranks no longer interfered with the front wheel, and the bottom bracket was flipped the right way around:
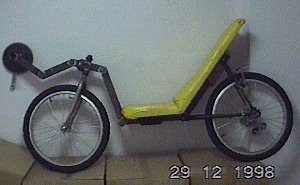
The bike after surgery (unretouched photo)
Well, it didn't quite work out that way. The bottom bracket was way too high (guess I should have done some measuring or at least some estimation before applying the hacksaw) which made for a very uncomfortable pedalling position. Also my knees came up too high, and that made the steering column quite high as well. The good points? The frame is quite springy, so suspension is unnecessary. Being low to the ground is a nice feeling.
This project is shelved for the time being as I am too busy riding and enjoying my Mercedes Bent.