
Recumbents - Suspended SWB Bike
I've come to the conclusion that I enjoy building recumbents a lot more than riding them. This is because I had so much fun building my trike, but rode it only once. And, I suspect, so do a lot of home-builders, especially the more prolific ones. After all, where can they find the time to ride their liegerads if they're busy building all the time? Not that there's anything wrong with this, of course. To each his own. You ride, I'll build. But most of all I enjoy writing about building my recumbents.
My recumbent trike lay rotting in the lift lobby outside my apartment for a few months until my condo manager (yes, him again) sent out a circular to all the residents reminding them that the lift lobby was a common area and should not be cluttered up with bicycles and "other things". I took that as a strong hint that I should be doing something about the monstrosity outside my door. So I took a long hard look at it and my growing cache of recumbent bicycle pictures gleaned from the WWW and decided to convert it. After all, there must be some reason why the vast majority of recumbenteers (now there's a nice word) choose 2 wheels instead of 3. OK maybe it's the cost, but speed, lightness and simplicity are probably factors as well.
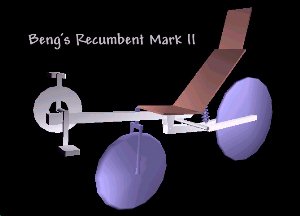
This time I decided to do some designing before actually laying hacksaw to metal. This is what I came up with:
Concept drawing of rear-suspended SWB USS recumbent.
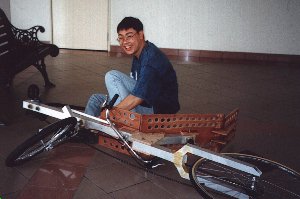
Looks nice, doesn't it? Most concept drawings do. No chains and cables, you see. The large majority of parts are scavenged from the trike ie the bottom bracket, main frame, seat, front fork and wheel. The seat was drilled with lots of holes to reduce weight. All I needed to do was to fabricate a rear swingarm, stick on a wheel and attach it to the frame. The rear swingarm proved to be the major challenge. In the end I decided to make the forks out of 2 pieces of 1 1/2" square section aluminium tubing bent at 45 degrees and glued to a piece of 2" square section aluminium tubing, forming a swingarm. This picture gives you a good idea what I'm talking about:
The fall was not faked, but yes, this is a posed shot (after falling).
Always remember to wear a helmet while riding.
Slots were cut into the ends of the swingarm for the rear wheel to be bolted to. Remember we are talking about 2 mm thick aluminium - not exactly industrial strength. The rear swingarm was bolted by a single bolt acting as a pivot to the plywood dropouts which were in turn glued and bolted to the frame. This bike had underseat-steering (USS) with a rod linkage much like Don Boose's. The handlebar came from the original made-in-China tricycle! The suspension unit came from a motorcycle parts store ($18 per pair), and actually belongs on one side of a Suzuki CG125 motorcycle. It proved to be a little too weak, and I later upgraded it to a suspension unit from a bigger motorcycle ($40 per pair). This was a very heavy unit and constituted about half the weight of the entire bike, which is why I later abandoned the idea of a rear suspended bike. I just wanted to see if it could be done, that's all. You can see the first suspension unit being squashed to the limit in this picture, which was taken during my very first ever ride on a two-wheeled recumbent:
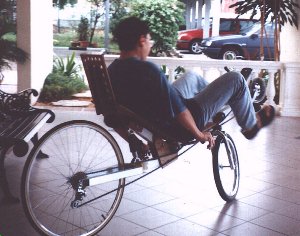
My first time
It took me about half an hour to actually learn how to ride the darned thing. It was only after I stopped to think about how I ride a normal bicycle that I realised the key was simply to push off boldly enough to gain momentum and develop enough gyroscopic force in the wheels to keep you going in a straight line. It worked! After that it was plain sailing. It was an exhilarating experience to be riding a bicycle that you built with your own hands. I'm sure the Wright brothers must have felt something like this.
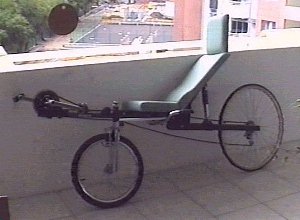
Later I dismantled the whole bike, spray-painted the frame stealth-fighter-matt-black (mainly to camouflage all the unsightly bits here and there) and had a furniture shop pad the seat and cover it with waterproof PVC fake-leather. Here are pictures of me riding the finished article:

That's my son in the foreground

Trying to look cool whilst keeping my balance
The rear suspension worked very well, soaking up bumps like you wouldn't believe, when it wasn't bottoming out. Unfortunately most of my weight was over the front wheel, which wasn't suspended. Later I installed the rear derailleur cable, but it would keep shifting gears on its own, because of the movement of the swingarm up and down. The bike was pretty long and unwieldy, and had to be stood up on the rear wheel whenever I used the lift to bring it back to my apartment. But it was GREAT FUN to ride!
In the end I decided that the suspension had to go, in the interest of rideability. I unbolted the suspension unit, moved the swingarm forward and bolted it with three bolts to those plywood dropouts attached to the frame. The rear swingarm was now a rigid one. This shortened the wheelbase somewhat, and eliminated the gear shift problem, as well as cutting down the weight of the bike significantly. I also converted the steering to above-seat-steering (ASS) due largely to Shari Bernhard's confession on the HPV list. The conversion is covered in my description of my ultrashort wheelbase ASS bike.
Because I had not painted the trike and it had been exposed to UV radiation for some months, the epoxy had begun to disintegrate. This resulted in the head tube (which had been simply glued into a hole in the frame) breaking loose after the front wheel hit a severe bump. The same thing happened to the bottom bracket when I tried to accelerate hard. I glued back the head tube and reinforced it with glass fibre tape this time and painted it to protect the epoxy from UV radiation. I also put a bolt through the tube attached to the bottom bracket, but that didn't work very well, so I came up with a better system, described here.