Recumbents - Tricycle
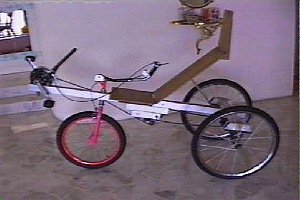
My home-built recumbent trike - now extinct
Hope you like my trike. It's finished, as in I cannibalized it to make my SWB. Truth is, I only rode it once, from my secret workshop to my home.
I stumbled onto the recumbent scene quite by accident. I was poking around the Internet looking for ideas for a pedal-powered paddle-boat, and came across the IHPVA site. It brought back memories of watching a TV programme about HPVs more than 15 years ago (I think it featured the Gold Rush). I thought it was way cool, and in fact was seriously considering building a full fairing for my (upright) racer, but realised that cross-winds would easily topple me. Well, that's my excuse for not doing it then, anyway.
So anyway, this time I was inspired (after many visits to IHPVA and Bikeroute) to build a recumbent trike. Initially I wanted to build a Windcheetah / Greenspeed equivalent (tadpole configuration), but realised that with my limited skills, that would be a bit too ambitious. So then I thought I'd do something like a Flevotrike or Blase's Tricycle or Arybert Lekkerkerk's Jouta VX, ie a front-wheel drive, mid- or rear-steered trike and actually started work on the frame. Then I chanced upon the Comfortcycle Chaise, which was a real inspiration for its simplicity:
The Comfortcycle Chaise
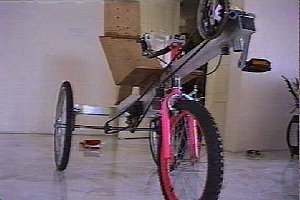
The decision point came when I saw this cheap made-in-China upright tricycle in the bike shop. In my mind's eye, I could see it morphing into a Comfortcycle Chaise. It had a ready-made rear axle / wheels / sprocket unit, which I could cannibalize and save myself a lot of trouble. Here's a picture of it before I mauled it (I only rode it twice):
The China-made tricycle before I chopped it up
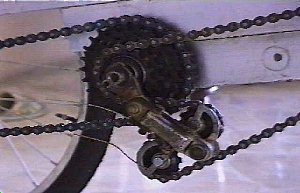
The two rear wheels and axle are awfully heavy (those are cast-iron axle supports - they are bolted onto the frame). I think it accounts for more than half the weight of my trike. It would have been even heavier if I had not hacksawed off this huge cast-iron braking disc as well which was screwed onto the rear axle. The sprocket drives only the wheel on the right side. The left side freewheels, to prevent scrubbing and squealing. One day I will get a pair of bearings and an aluminium rod and build my own rear axle.
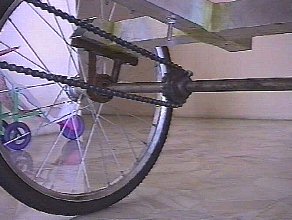
Rear axle with cast-iron support and sprocket arrangement
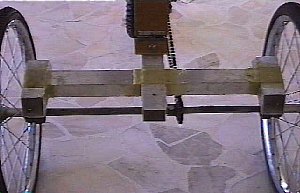
Picture of frame from rear of trike; the lateral position of the sprocket is adjustable!
The frame is made of 2" square-section aluminium tubing (a la Flevo) glued together with epoxy (a la Trek) and reinforced with 2" wide fibreglass tape (a spin-off from my boatbuilding experience). I think it's pretty strong and rigid, and hopefully will last longer than the aluminium frame itself. It will be ridden mainly on tarmac, anyway, and not off-road, so there should be no problem there. I chose square section tubing because it is (very) easy to align. Aluminium is light and strong, and easy to work. It was glued because I can't weld / braze etc. All the parts to be glued together were first roughened with an angle grinder to improve the epoxy's grip.
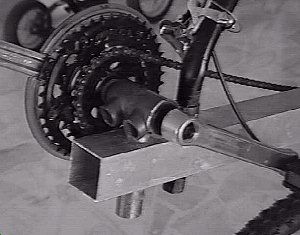
The bottom bracket glued to the front of the frame.
The bottom bracket shell is from an old ten-speed racer. I cut off everything except the seat tube, which went upside down into a round hole in the frame (made with a hole saw) and was epoxied into place. The post just behind came from an old folding chair which was originally destined to be the seat, except it was too big.
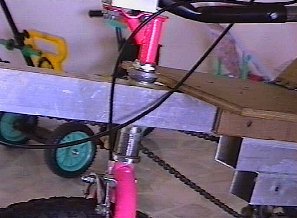
Headset, front fork, steering system
The head tube was made from mild steel tubing, also inserted into a round hole in the aluminium frame and epoxied into position. The headset cones were then banged on. The front fork and wheel and steering stem were from an old BMX bike which was actually destined to become a 12-cent 'bent until I decided that I did not want to put my foot down while stopping at traffic lights (Singapore is a highly urbanised country) but needed a trike instead. You will notice that it's more of a CLWB or even SWB instead of a LWB as it was initially meant to be. This is for the sake of compactness. I chopped off the excess 2 to 3 feet of aluminium frame in front of the bottom bracket. The trade-off was a higher seating position. In any case I don't go fast enough (yet) to benefit from a lower centre of gravity.
Freewheel arrangement. I know - the chain is too long...

The plywood jockey wheel holder
The intermediate freewheel came from the same ten-speed racer. I had to get the local bike shop to remove the freewheel pawls for me, at the same time that I changed the bottom bracket from a cottered-pin to a cotterless one. The freewheel was bolted onto some square section aluminium which was in turn epoxied onto the frame. The rest of the set-up is the same as John Charlton's. The chain clears the front fork by a jockey wheel from an old derailleur screwed onto a piece of plywood which is (you guessed it) epoxied onto the frame.
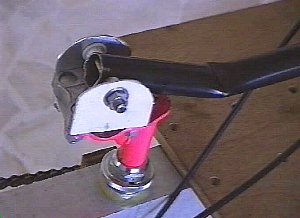
The steering tiller - fashioned out of a scrap piece of square section aluminium and metal pipe
The steering system is actually a tiller disguised as a joystick. It can be raised and lowered, and steering is achieved by swinging the tiller outwards in the opposite direction you want to steer. It works well, except that you can't pedal and turn at the same time (you have to keep your leg down when you swing the tiller). In a straight line, however, it looks quite cool, like a fighter pilot / windcheetah joystick. It works OK for a trike, but is impossible to ride for a bike.

The seat bolted to the frame
The seat is made from plywood hinged together and bolted down to the frame directly. I've gotten a furniture maker to put some padding and a PVC cover on, but you can't see it in these photos, since the trike has evolved into a SWB rear-suspended bike, and then into a SWB ASS bike.
If you would like to meet more HPV-minded people, I can recommend no better source than Kathy's 'Bent Folks Site.